LookDev Insights: Redshift feather UVs
Look Development, often abbreviated to LookDev, is a key part of the pre-production process. LookDev is the process through which the overall visual style and feel of a project is developed; for example, LookDev artists may be given a character design, but it is down to them to work out what their skin, hair and clothes will look like in any given situation, from sunny days to gloomy, rainy days.
Our LookDev series is here to give you an insight into what LookDev involves, starting with this post from Senior LookDev Artist, Michael Cauchi! Keep reading for a look at some of the common issues found with Redshift, a rendering programme, and Yeti, a software used for developing hair, fur and feathers.
Outlining the problem:
With the current builds of Redshift and Yeti there is no support for per vertex attributes on grooms. Instead, Redshift can only read 1 float value per hair/ per attribute. This presents a pretty large issue for UVs on a feather as we require different values along the hairs for the U coordinates.
Luckily, we have a workaround for this!
-------------------------------------------------------------------------------------------------------------------------
What we need to create custom UVs in Redshift:
In order to create our custom UVs in the shader, we require a couple attributes from the groom. Below I will explain what each one is for!
feather_param:
feather_param is a default attribute within Yeti. This stores each barbs position along the spine of the feather, since this is stored as a constant value per hair; Redshift will render this attribute with no issue, so we will use it for our V coordinates.
rsHairPosition:
rsHairPosition - as you may have guessed - is a standard Redshift node. Its job is to give you the position along a hair, weirdly this is usually done by per vertex attributes from Yeti (strandu). rsHairPosition returns a value of 0 at the root of a hair, then creates a linear gradient up to a value of 1 at the tip of a hair.
Feather_part:
feather_part stores an integer value for each part of the feather. It stores a value of 0 for the spine, a value of 1 for the left of the feather, and a value of 2 for the right of the feather. This will be helpful later when we wish to create a left to right gradient along the feather.
-------------------------------------------------------------------------------------------------------------------------
Constructing UVs in our shader:
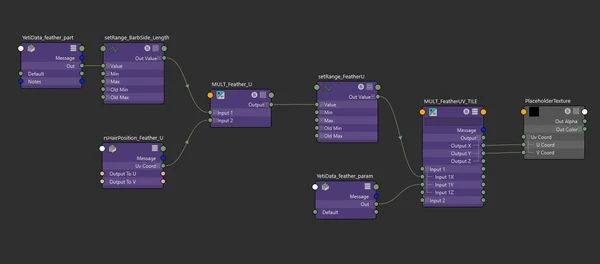
Now that we have our attributes we can start building our custom UVs in shader. Attached is an image of the network.
Step 01 - V coords:
First step is nice and simple. Create a rsUserDataScalar node and add "feather_param" to the attribute name. Please note this is case sensitive!
Step 02 - Making feather_part useable:
Annoyingly, it gets a lot more complex now... Create another rsUserDataScalar node and add "feather_part" in to the attribute name. Now plug this in to a setRange node and copy these settings:
Old min = 1
Old max = 2
Min = -1
Max = 1.
Doing this puts a value of -1 on one side of the feather, and a value of +1 on the other side! (Pssst, you can play about with these numbers to get different effects too)
Step 03 - Combining feather_part with rsHairPosition:
Create a rsHairPosition node. This node will give us a ramp from 0 - 1 root to tip on the hairs. The issue is that a feather has two sides, this results in purely symmetrical UVs unless we use feather_part. Luckily, since we remapped our feather_part to be -1 to 1 we can now just multiply rsHairPosition with the setRange node.
Step 04 - Normalize the U coords:
The previous step created a ramp across the feather that goes from -1 to 1. In order to make this a little easier to work with we should normalize it, simply connect the multiply node to a setRange and copy these settings:
Old min = -1
Old max = 1
Min = 0
Max = 1
Congratulations, you now have a linear ramp that goes from the tips of the left side of the feather to the tips of the right side!
Step 05 - Final assembly:
Our final step is to put our custom UV attributes together in an artist friendly way. Since we are using custom attributes we are obviously avoiding the place2dtexture node.
However, we can still repeat our textures pretty easily.
Create a multiply divide node and plug "feather_param" in to input 1Y.
Then, connect our setRange U coords to input 1X.
We now have UVs!
To tile textures, simply change the values of input 2X and 2Y on the multiply, as these have essentially become repeat U and repeat V from a P2D node :)
-------------------------------------------------------------------------------------------------------------------------
Known limitations:
The sad reality of the process above is that this creates what is called "Parameterized UVs" Which means the UVs fill the whole 0 to 1 UV space. This is great for ramps but it makes painting specific designs quite tricky. My recommended workflow is to paint the design you want on to a feather shape, then take that texture to nuke or photoshop and warp it to fill the full square texture. Hopefully it won’t be long until redshift supports per vertex attributes in yeti. Once this happens we can switch to "projected UVs" which are much much easier to work with!
Additional tip 01:
One of the biggest issues with feather texturing (in any tool) is that every feather receives the same texture unless you set up multiple texture files. That said, if you make tileable feather textures you can actually offset this on each feather using a random value per feather. This will let you get subtle variation per feather with very little work
Additional tip 02:
For feathers that are shorter on one side than the other (Like, most primary flight feathers) you can do 2 things.
First option is to go back to the remap of feather_part and change the values of the new min and max to represent the average length of the barbs on each side.
The second option is to multiply the whole thing by the length of each barb, however due to variations in scale this may give very ugly results!
*At time of writing we are using Redshift 3.0.44 and Yeti 4.0.1